¶ Connect Azure Logs
¶ Overview
Microsoft Azure Storage Explorer is a standalone app that makes it easy to work with the log information stored in Azure Storage.
We can access to the log information stored for the Client, DTS or ERP services, and we can filter the information using some functions like queries that allow us, find the cases that we need in each moment.
All the log information that is generated by our application is automatically stored in Azure Storage, so with this application, we can find the errors messages or warnings that could be produced in the execution of our services.
¶ Download and install
The first step is download and install Storage Explorer. In the next link we can find the download link to obtain the last version of the application → Download Storage Explorer
When we have the file downloaded, we can do double-click in the file to start with the installation process:
¶ 1. Accept the License Agreement

¶ 2. Select the installation folder

¶ 3. Select Start Menu Folder

¶ 4. After that, the installation is in progress. When the installation finished we can launch the application

¶ Connect to an individual resource
First of all, we have to get the connection string from the Order Manager Portal, with the data to connect to the specific log that we want to read. In the following image, we can see the location of the connection string. We have to access to Connect in Order Manager Portal, select Connect and Logging Tab. In this tab, we can obtain in the Access Log, the connection string for each service, one for the Client, DTS or ERP

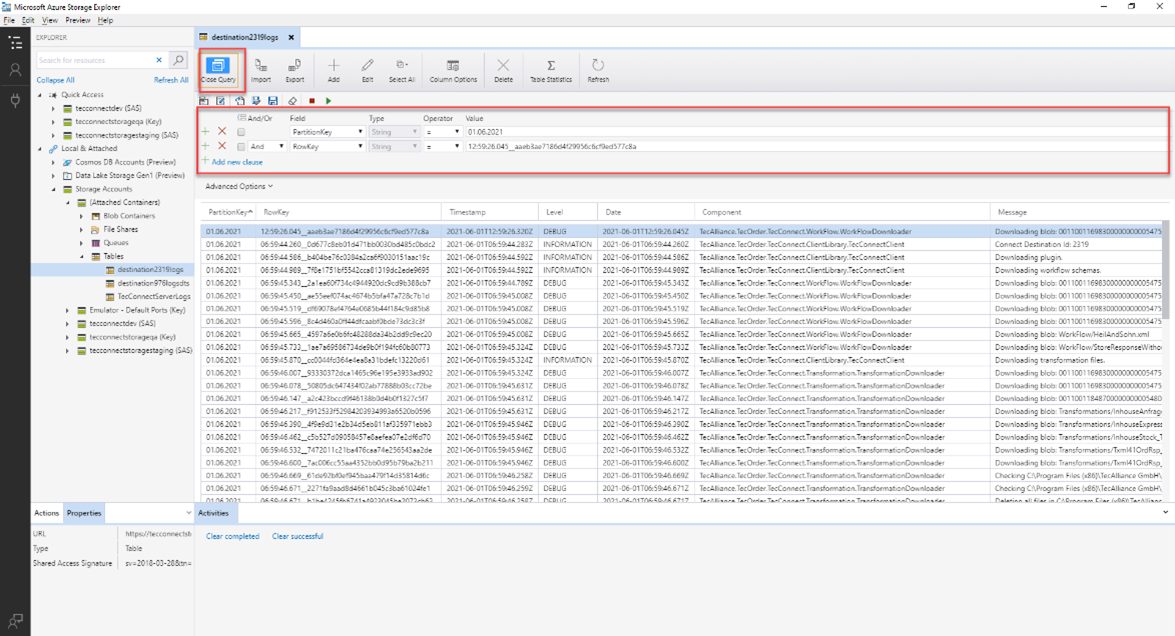
Now, we can open the Microsoft Azure Storage Explorer to add the connection to the individual resource. For that, we have to select the Connect button in the left-hand toolbar.

Then select the shared access signature (SAS) URI

We can include the connection string obtained in the Order Manager Portal in the URI field, the display name is calculated automatically from the URI, but we can customize the display name after the URI is included:

Click on Next button and then on the Connect option to confirm the connection to the resource.
Now, we have the connection done successfully to the resource and we can see all the log information stored for the service selected:

¶ Search Options
We have different options in the log table that we will explain now: queries, column options, export…
¶ Queries
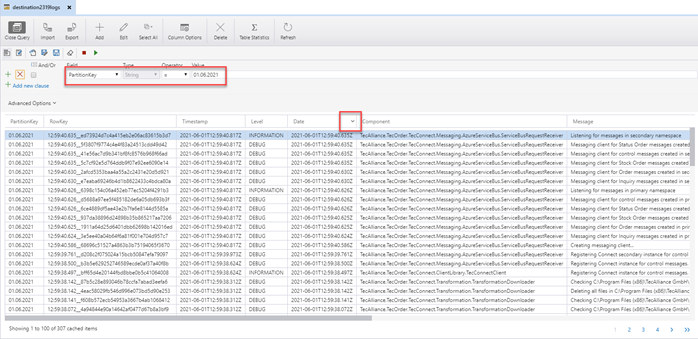
In the top of the table, we have an option that allow us to filter the logs for each column that is shown in the table. When we click in the button Query in the top, a list of text box appears over the table as we can see in the following image:
In each row of the filtering section, we can select the column where we want to filter (Field). In some columns you can select the Type of the comparison operator (String, Boolean, DateTime, Int32, Int64….). Also you can define the operator to use in the filter and the Value to compare.
Now, we will show some examples of most used queries that can be an example to explain the way to use the queries in the storage explorer:
¶ Filter by PartitionKey (Date)
We want to show all the log information shown in a specific date. Also we can order the date to see an specific time in the day which log was shown
¶ Filter by Period of time
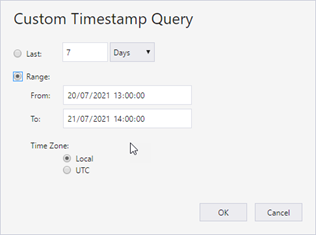
We want to show all the log information shown in a range of date. For example, all the log information in the last hour. In the Value combo you can select different ranges like Last 24 hours, Last 7 days…

Also, we can use the Other Value “Custom” option to define a range in a specific date:
In this case the result is the following:

Other way that we can filter a period is define a specific date and a specific range of hours that we can see the log information, for example on 20th July of 2021 and the time between 13:00 and 14:00

¶ Filter by Transaction Id
Other interesting query is filter all the log information related with a specific transaction that we want to investigate

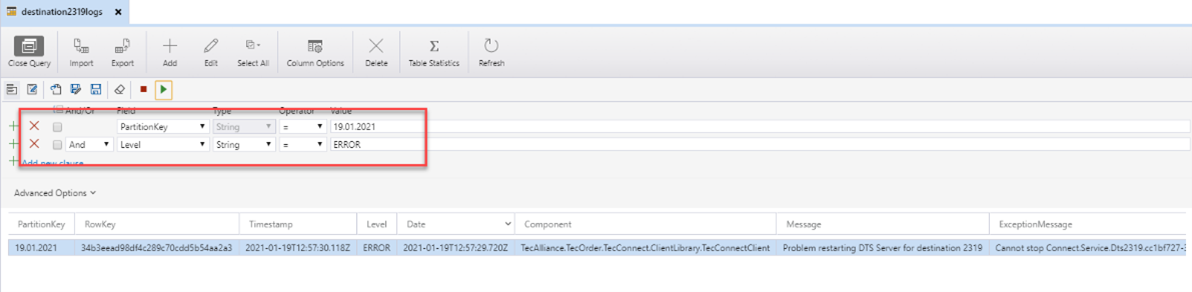
¶ Filter by Log Level
We want to show all the logs for a specific level shown in a specific date
¶ Filter by Document Type
We can generate a query to show all the log messages related with a specific type of document. For example, we can show all the logs for Inquiry request shown in a specific date

¶ Filter by Receiver TecId
We want to show all the logs for a specific date that is related with a specific tecId for the receiver

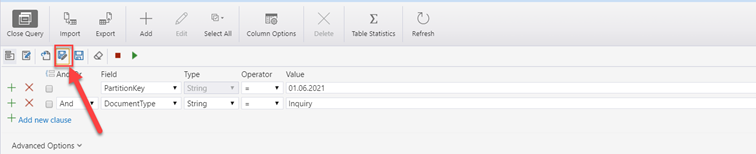
¶ Query Editor
In the query options, we have the possibility to save the queries that we prepared to use later, and also load the saved queries that we have. In the following image, we can see the button where we can click to save the current query that we have defined in the editor:
On the button next to it, we can import the stored queries that we have in the disk:

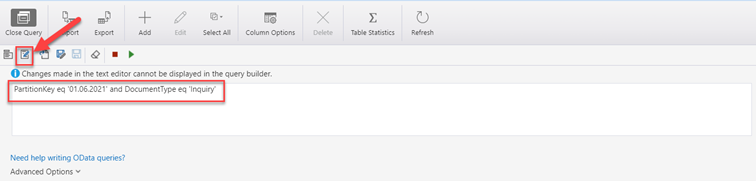
Finally, we have the option to see the query in a text editor mode, where we can modify or copy from an outside place:
Now, we go to list all the queries that we have explained in the previous section in this format. So, we can directly access to this text editor mode, and directly copy and paste the query that we want to use and adapt for our specific case:
PartitionKey eq '01.06.2021'Date ge datetime'2021-07-20T12:00:00.000Z' and Date lt datetime'2021-07-20T13:00:00.000Z'PartitionKey eq '20.07.2021' and RowKey ge '13:00' and RowKey le '14:00'PartitionKey eq '01.03.2021' and Transaction eq '6f2b1c98-5a25-4a8e-90bf-b04670afcda6'PartitionKey eq '19.01.2021' and Level eq 'ERROR'PartitionKey eq '01.03.2021' and DocumentType eq 'Inquiry'PartitionKey eq '01.06.2021' and ReceiverTecId eq '001100116983000000000054753001'
¶ Column Options
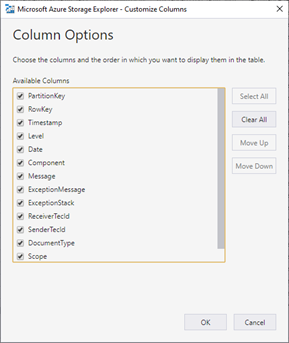
In the top of the log table, we have the button Column Options, where we can select the column that we want to show in the log table. We can filter and include only the columns that should be interesting in each case:

When we click in the button we have the following columns to select:
- PartitionKey: Date when the log was generated.
- RowKey: Field that start with the time in milliseconds when the log was generated concatenated with a new ID to ensure a new value for each row. It is an index of the log table.
- Timestamp: Date and time in milliseconds when the log was generated.
- Level: Level of the information shown in the log: DEBUG, INFORMATION, WARNING, ERROR or CRITICAL.
- Date: Date and time in milliseconds when the log was generated.
- Component: Namespace of the class that is generating the log information.
- Message: Message info
- ExceptionMessage: In the case of ERROR or CRITICAL, the message for the exception generated in code.
- ExceptionStack: In the case of ERROR or CRITICAL, the stack trace for the exception generated in code.
- ReceiverTecId: The TecId of the receiver if this value is available in the place where the log is generated.
- SenderTecId: The TecId of the sender if this value is available in the place where the log is generated.
- DocumentType: The type of the document that is being processed in the place where the log is generated.
- Scope: Deprecated. It is not in use at the moment.
- Transaction: The transaction id of the message that is being processed in the place where the log is generated.
- Configuration: In the case of the ERP log, we have the information for which number of the ERP configuration that is writing this log message.
- Instance: In the case of the ERP log, we have in this column the number of the instance that is writing this log message.
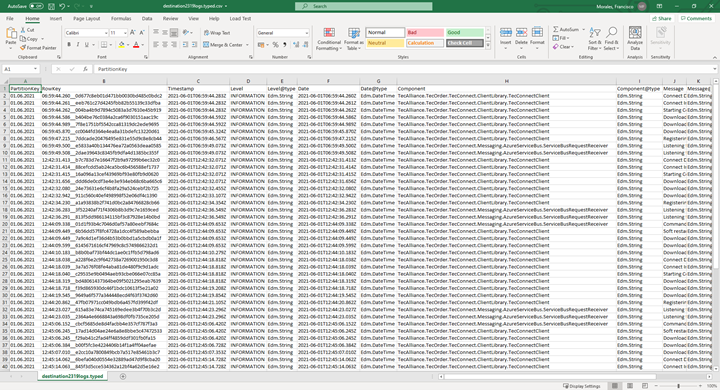
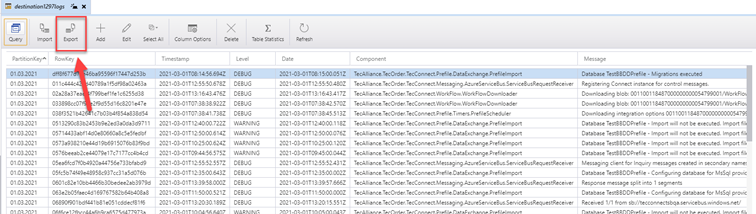
¶ Export
We have an option in the top of the log table, where we can export the results that we have in this moment in the table in a CSV file. This option can be interesting if we have a lot of result data and we want to analyse in more detail. With this CSV file, we can use for example Microsoft Excel to handle it and filter rows with some more complex conditions if we need.
We have to click in the Export button, as we can see in the following image, and then select the folder and the filename where we want to save the exported CSV file.
In the following image we can see a CSV example for the previous result of the log table