¶ Overview
In this video we show you how to start placing orders and inquiries to any of your partners in TecCom.
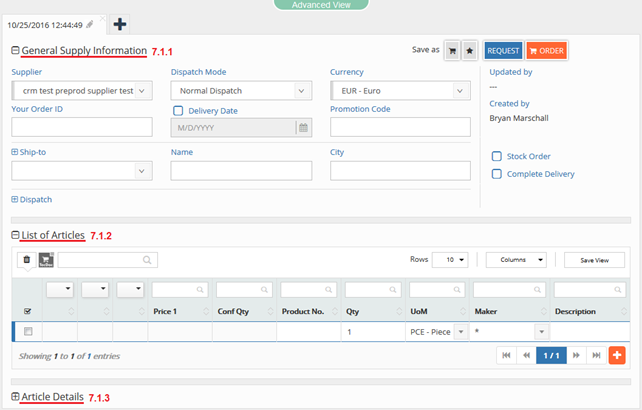
The order form of TecCom Portal is clearly divided into three sections. In the upper section you can find the general supply information, which is valid for the entire order. Located in the central area is the list of articles for the input of the individual items. In the lower section you can see the article details of the respective article.
In addition, you have the option to switch between a "Simple View" and "Advanced View". While the Simple View is clearer with a reduced number of fields, all fields are displayed in the Advanced View.
You can also edit multiple shopping carts parallel by clicking on the + sign above. This opens additional tabs for separate shopping carts in TecCom Portal.
Request & Order process improved
After a request or order was sent, it is possible to continue working in TecCom Portal and e.g. carry out several requests or orders simultaneously. A notification system was implemented to inform about the status of the shopping carts and getting redirected to the corresponding shopping cart.

¶ General supply information
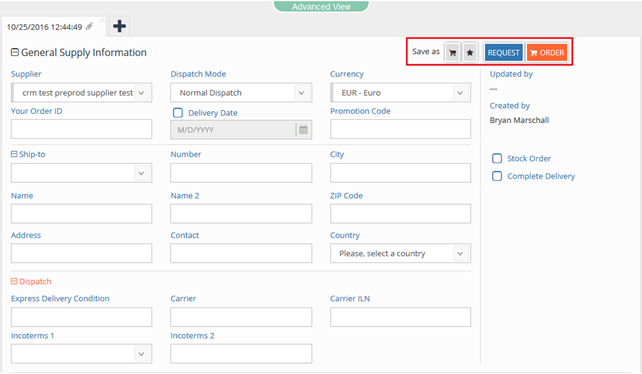
Before sending out a request or order, you have to select a supplier. Then you can determine the dispatch mode and currency. You also have the possibility to select or determine whether it is a stock order and specify the delivery date. In addition, you can decide whether you want to receive the delivery as complete delivery. Click on Request for information regarding i.a. availability, or click on Order to submit your order. You get a response from the supplier regarding the availability and the status of each item, displayed in the list of articles with different symbols.
It is also displayed who created or updated the shopping cart.
With Ship-to you have the option to specify an alternative delivery address. If no number is pre-filled by default in Administration, then you enter here the required information.
The shopping cart can be saved directly as a Shopping cart or as a Favorite. The favorite function is used as a practical template for recurring orders that are carried out regularly.
Dispatch only applies to imported data files.
By clicking on the pen next to the shopping cart name, you are able to rename the shopping cart.
¶ Supplier selection and dispatch modes
As of release 23, the supplier selection does not list the individual business relations anymore. Instead you see a list of each individual supplier. The business relation used will depend on what you choose for the ship-to.
For example, if at least one of the business relations with the selected supplier have an optional delivery number, all ship-to addresses are listed in the ship-to dropdown. Mandatory delivery numbers that have no associated ship-to address are also listed. A manual ship-to address can be entered, including a delivery number.
If all business relations have delivery party number as mandatory, only ship-tos that have an associated number are listed in the ship-to dropdown. Delivery numbers that have no associated ship-to address are also listed in the same drop-down as read-only. A manual ship-to address cannot be entered.
If all business relations have delivery party number as not allowed, only ship-tos that don't have an associated number are listed in the ship-to dropdown. A manual ship-to address can be entered, but cannot include a delivery number.
In cases where only business relations with mandatory and not allowed delivery-party numbers exist, all ship-tos, with and without associated delivery numbers, are shown. A manual ship-to address can be entered, but cannot include a delivery number.
Please Note: In cases when you have multiple business relations that have different buyer numbers, the TecCom Portal will display these as different entries in the supplier list. This is due to technical reasons, since the TecCom Portal cannot distiguish the business relation by its delivery party number. In this case select the business relation in the supplier list. The entries will contain the different buyer and supplier party numbers to help choose the correct business relations.
¶ List of articles
In the list of articles you can quickly and easily enter the product number, quantity and other data. To do this, enter the product number and / or the desired quantity in the corresponding columns.
Within the list view, you have the option to navigate with the keyboard using the Up / Down keys to scroll through the individual entries. The other fields of the row are accessed by pressing the Tab key. To add more items, press the Enter key or click on the button new article.
Select a row and click on Shift + Delete to delete a row or directly click on the trash bin . To delete multiple entries at once, select several lines using the checkboxes in front of each row. Per default, 7 of 10 columns are shown to preserve clarity. The selection is done through columns.
Moving articles from a saved shopping cart to another shopping cart is possible through clicking on the icon.

¶ TecDoc
With the TecDoc Button you can directly import or rather copy articles from the TecDoc Catalogue in the TecCom Portal shopping cart.
Licence:
You don't need anymore to store the TecDoc credentials in your user profil, we will automatic detect if your user has a valid licence.
Visit our TecAlliance Shop page to buy a licence and to find more information about the TecDoc catalogue.
If you have any further questions about your licence, please contact TecDoc support.
Instruction:
Currently you can only add articles from the catalogue which are added to the Direct search cart.
Please note that any article which you add through the vehicle category, cannot be added.
- Click on the
TecDocbutton (a new widnow opens with the TecDoc catalogue) - Search in the categories Universal, Tyres, Consumables and Batteries for the article or use the search bar at the upper centre
- When you found the needed article, you can modify the quantity and click on the shopping cart symbol right next to it
- Click now on the button
COPY TO BASKETto add the articles in the TecCom Portal shopping cart.
Click on Cancel to return to the TecCom Portal shopping cart without transferring the articles from the catalogue.
In the TecDoc catalogue all added articles will be stored there until they are manually removed.
Open the TecDoc catalogue and click there on the shopping cart symbol in the right upper corner to remove the articles.
¶ Article details
In the article details all the positions, which are selectively displayed in the columns of the list of articles, are displayed completely and can also be edited. Here you can specify whether a partial delivery is allowed and determine the delivery date at item level.

¶ Currency response
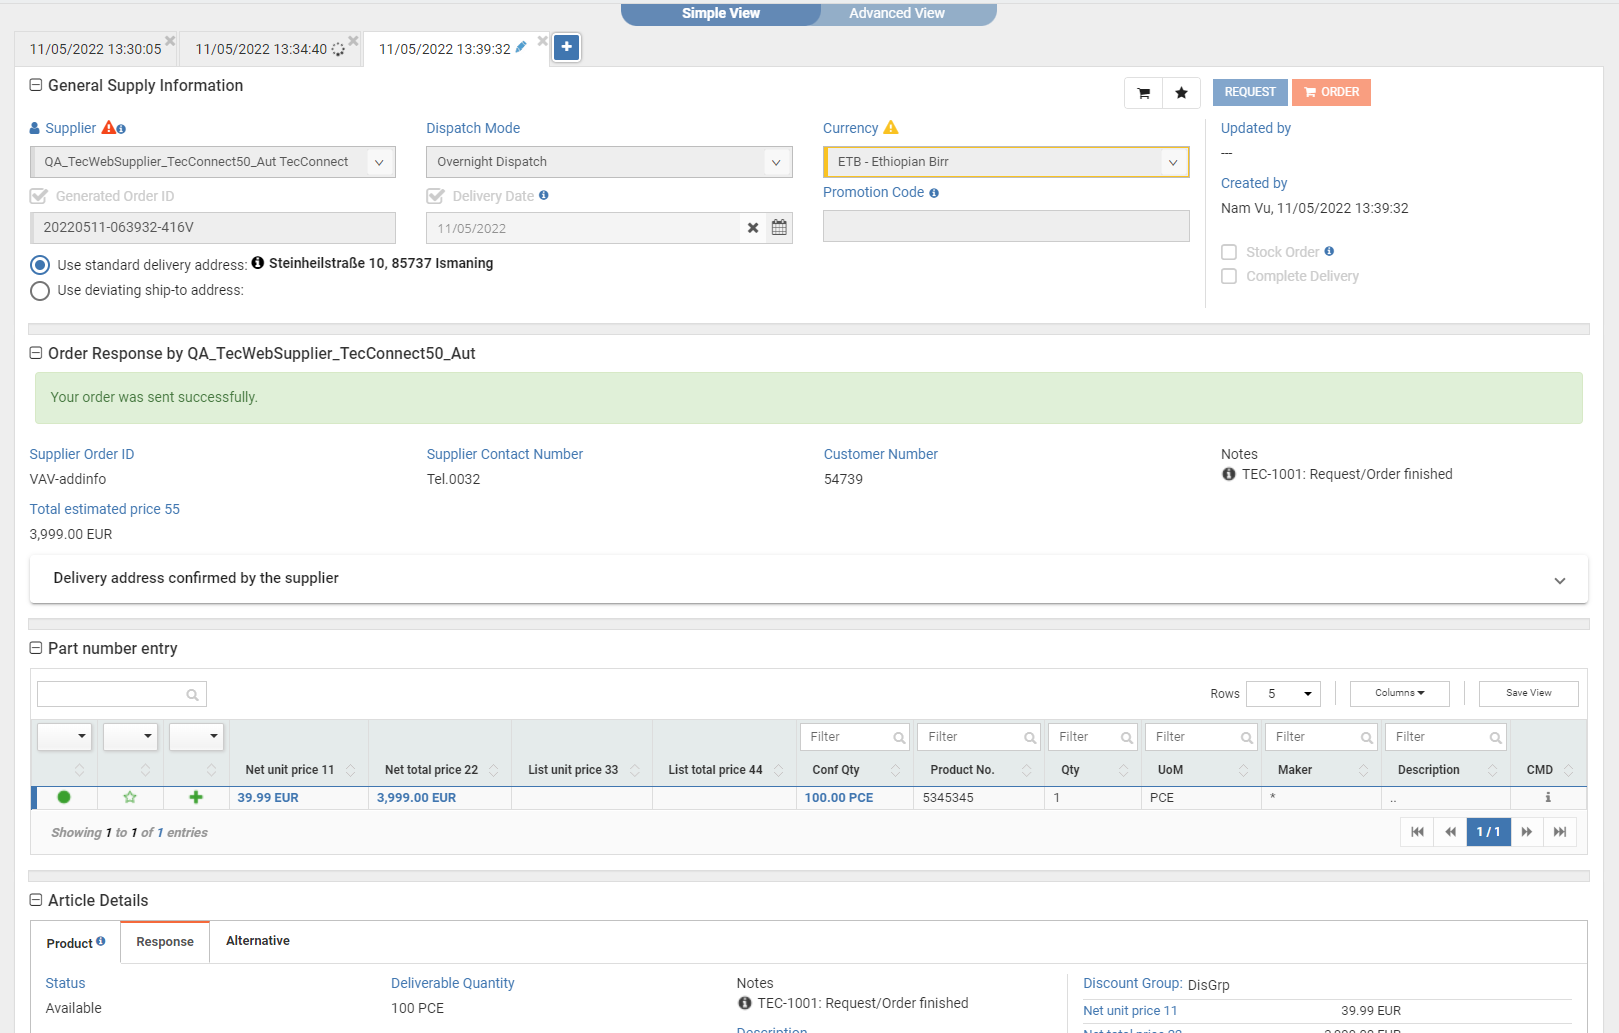
If the supplier sends in the response a different currency than the requested one, you will get an information about the change and the selected currency is highlighted. In the warning tooltip you can see the currency response.
¶ Response notes
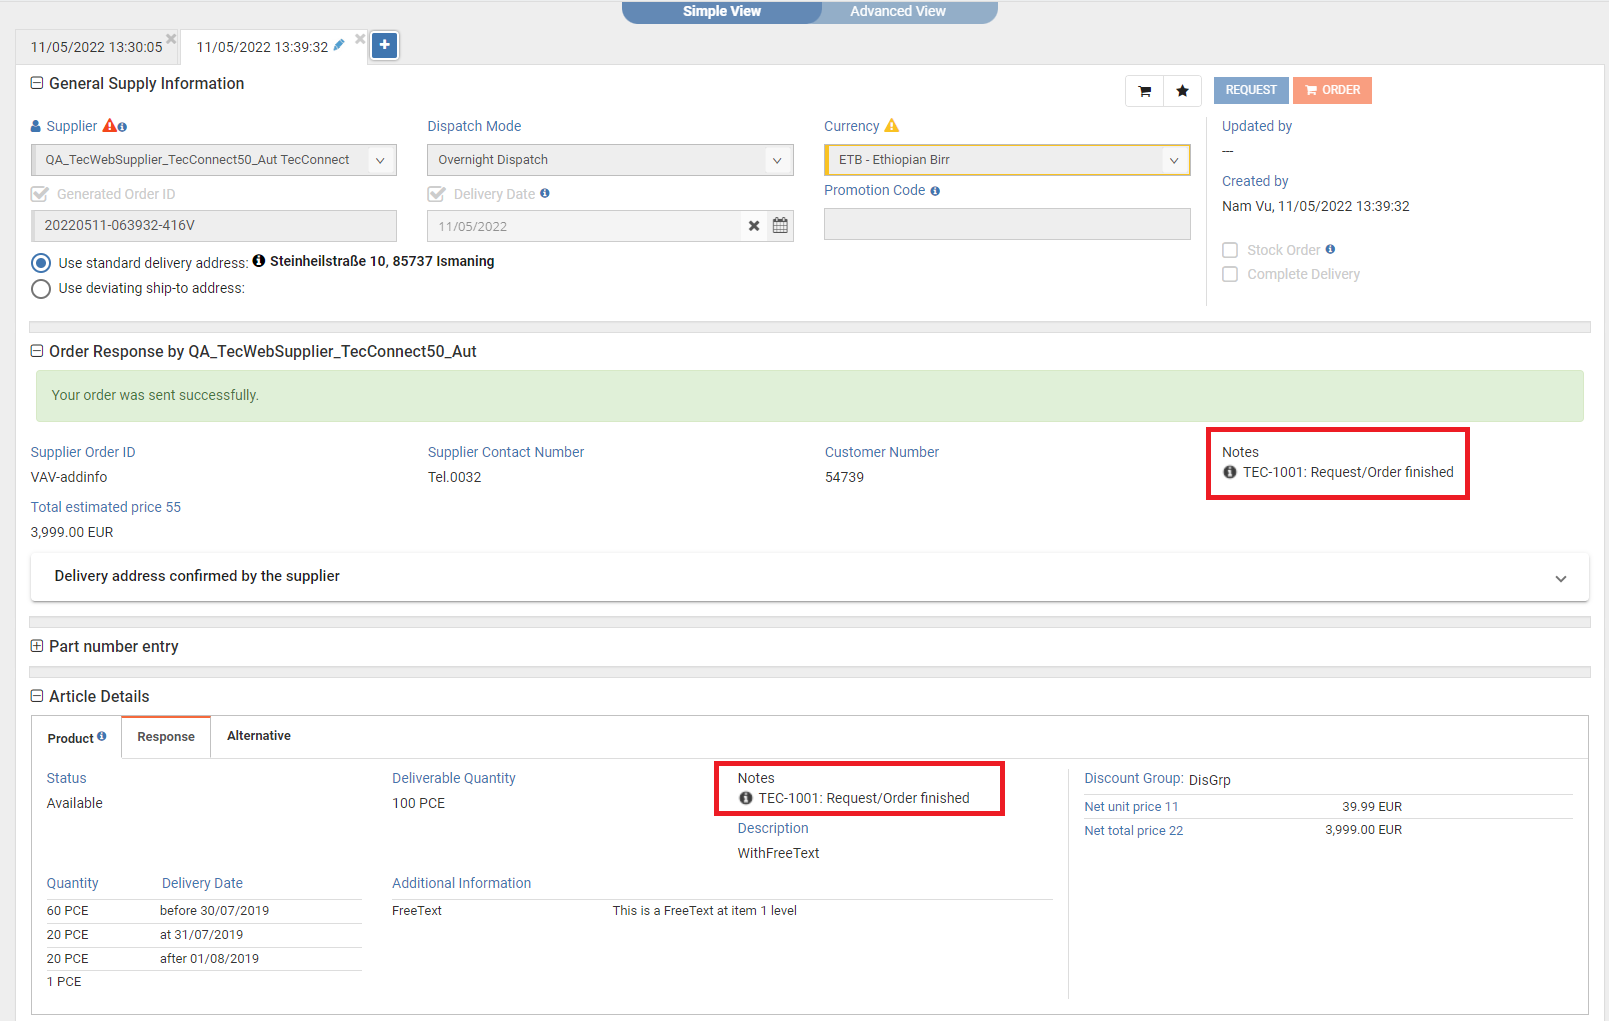
The supplier can send 3 different types of response notes: Information, Warning or Error.
These can apply either to the whole order or to individual articles.
¶ Total estimated net price
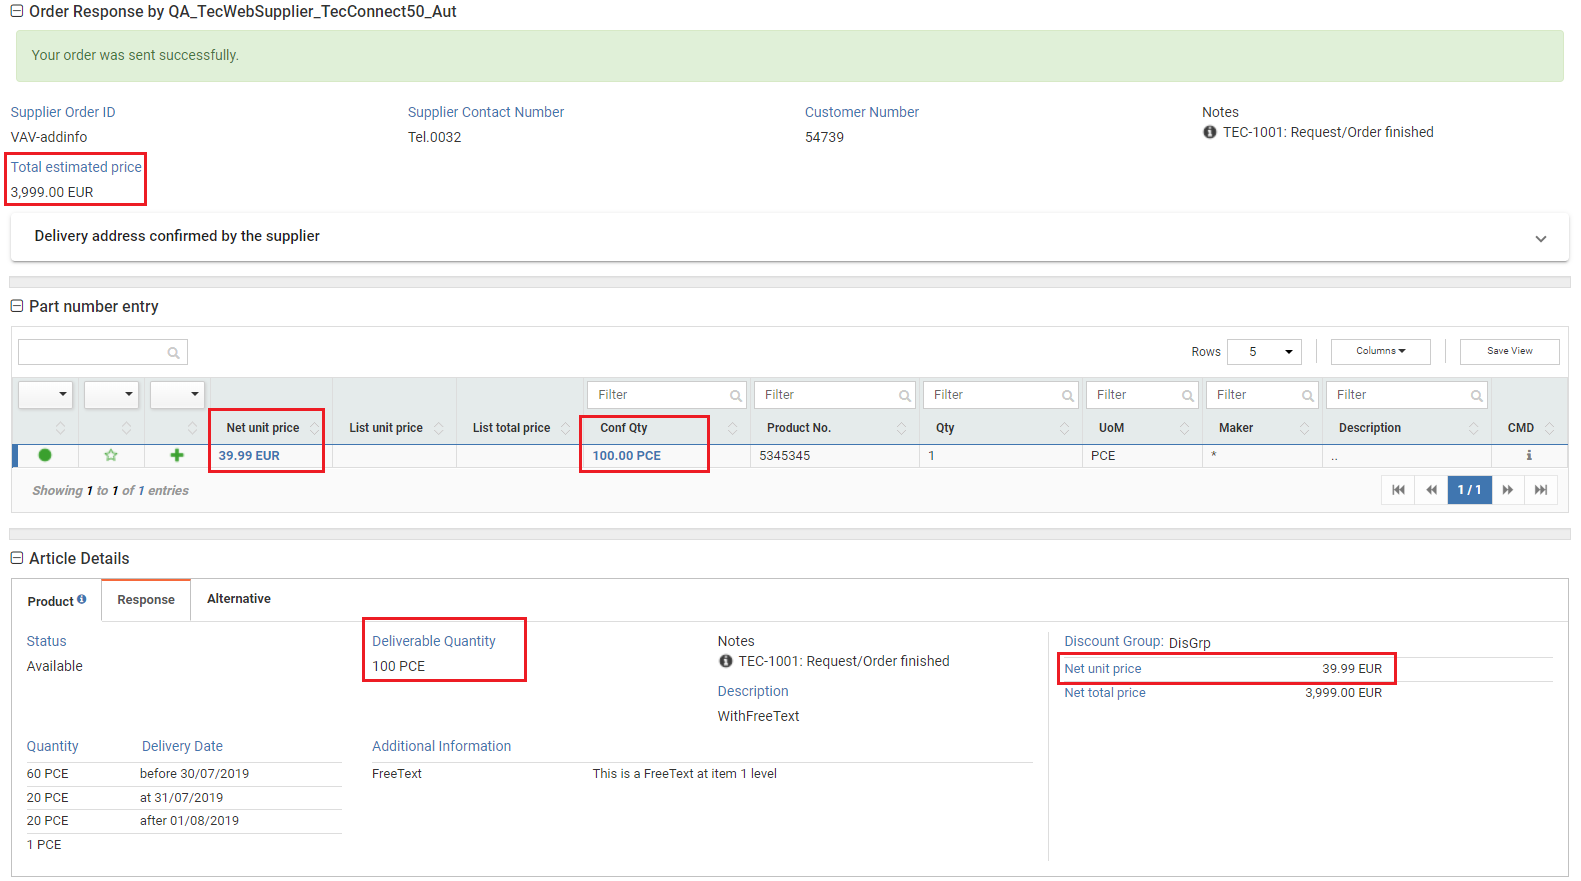
The price estimation represents the sum of all Net Unit prices multiplied by the Confirmed Quantity.
The total estimated price is calculated based on the articles that have a Confirmed Quantity greater than 0.
¶ Back Order
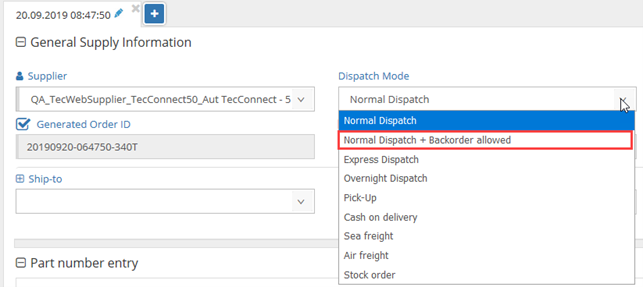
If Backorder is enabled in Member profile of the selected supplier, a second entry is displayed under the corresponding dispatch mode, "+ Backorder allowed" appended to the text.
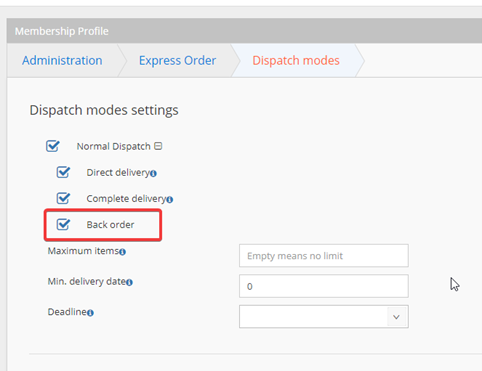
In the Express Order > Dispatch modes, a "Backorder allowed" checkbox is available for each dispatch mode.
¶ Additional CMD Article Information
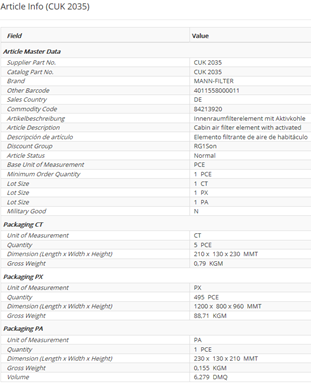
If the supplier supports in CMD general valid article data, the detailed information like dimensions and further packaging units is shown.
While typing the product number or article description in the field article number all corresponding hits are offered and you can identify the correct product number.
You can receive further detailed information for the related article after clicking on the i icon in a separated window.
Particularly in case an article is offered in further package sizes you can see the article quantity in this packaging unit as well as the related dimensions.
This functionality is also applicable in case suppliers do not provide for you article information via CMD so far.

¶ Article response
After a request or order you can also see the response for your article in Article Details in tab Response

¶ Prices
In the article response, the supplier can choose to send up to 6 types of prices and a discount group.

The net and list prices can represent a unit price, a total price or a price per unit of measurement.
¶ Unit of Measurement
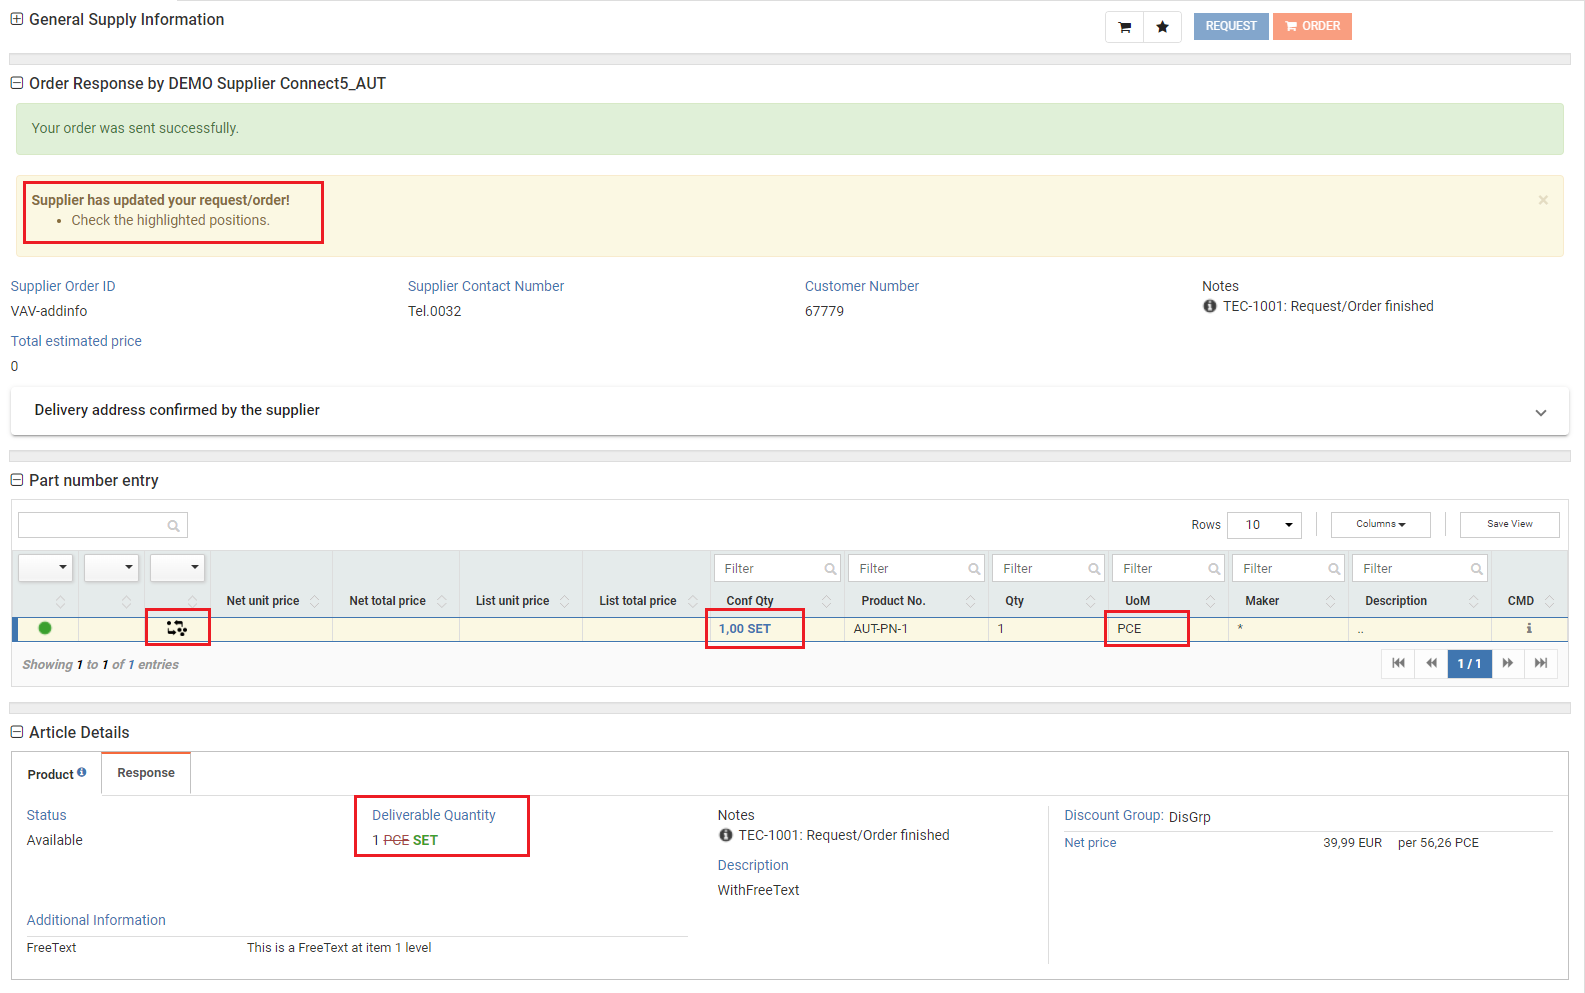
In the article response, the supplier can change the requested unit of measurement.
¶ Alternative articles
If the supplier sends information about alternative articles with the response, you can see it in Article Details in tab Alternative.

The button “copy” is available for request. If you click on it, the alternative article (Product No., Description, Maker and EAN code) is copied to the basket for this article.
¶ Quantity Variance
If the supplier changes your order/inquiry you can see the quantity variance for each article in the corresponding tab (Figure 35 Quantity variance tab).
You can see the quantity, unit of measure, as well as the deviation or modification reason. If the supplier provided a comment you can also see it here.

¶ Additional Information
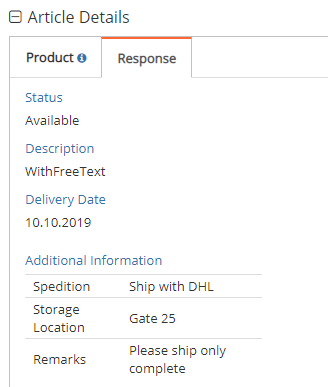
All additional information regarding this article that is provided by the supplier in the response is shown in the article details (Figure 36).
¶ Part Number Entry display settings
You have the possibility to adjust and save your Part Number Entry display settings in TecCom according to your prefer-ence.

¶ Selection of displayed columns (1)
If you click on Columns, you get a list with a selection of possible columns displayed on the page. If you like to compile your individual column display, please uncheck Default and select the respective check box for the columns that should be displayed.
If a column is marked with a check mark in the corresponding checkbox, the column is displayed. If no check mark is set, the column is not displayed. If you want to reset your individual columns display, then select the checkbox for Default. This will reset your customized columns view and only display the default columns.
¶ Selecting the number of entries displayed per page (2)
You can define for each page individually the number of rows displayed per page. To do this, select in the list the desired number of rows. The display instantly adapts to your selection.
TIP: Read the total number of entries
You can see the total number of rows below the displayed results. The total number is highlighted with blue color and you can also immediately see how many results are displayed per page.
If the total number of rows exceeds the display on a page, you can either increase the number of rows dis-played per page accordingly, as described in 4.1.2 Selecting the number of entries displayed per page or you switch with the arrows below the items to the next page.
¶ Permanent saving of the individual display settings
You can save your individual settings for the page permanently by pressing Save view. Your settings are thereby saved even after leaving the page or the session. By loading the page again, you can find your individ-ual display settings preset accordingly and adapted to your needs.