¶ 1. Enable Connect
In order to be able to use Connect for an organization, you need to login into TecCom Portal and go to Administration section. Once there, select Organizations subsection and enable the Connect checkbox for the organization you want to enable it for.
Note: TecAlliance needs to activate the Connect for your organizations so that you are able to enter configuration in TecCom Portal. Please contact your TecAlliance contact person to have this arranged.
¶ 2. Configure Settings
After enabling the Connect module you can now start configuring Connect settings. Once in the Settings section you will find different tabs, each allowing to configure different aspects of Connect.
Note: Remember to save the changes with the “SAVE” button in the upper right side of the screen after editing options.
¶ 2.1 Communication
In this tab you can configure the communication channel used by Connect. It is possible to choose between two options - Cloud or Direct.
¶ 2.1.1 Cloud Communication (default channel)
In case of Cloud communication, no configuration is required. Connect configures itself in the installation process.
Note: Make sure that ports used by Microsoft Azure Service Bus (5671 and 5672 for Advanced Message Queuing Protocol (AMQP) are opened. Further details can be found in the Connect requirement document.
¶ Advanced Options (Suppliers only)
In this section you can set the throttling of the messages received by Connect in order to prioritize some request types over others.
The numbers indicate how many messages are processed simultaneously and passed on to the ERP system. Certain message types can be prioritized over others by setting higher numbers. In general, by reducing the numbers, the numbers of messages sent to the ERP system and processed in parallel can be reduced, thus protecting the ERP system from overload. In case more messages arrive for a certain message type than are set in the configuration, they are first "parked" and processed with a time delay.
¶ 2.1.2 Direct Communication
Some scenarios may require direct communication. In this case some additional configuration needs to be provided. Connect requires a public and a private endpoint in order to be able to process requests. To increasing security, it’s also possible to switch to HTTPS protocol by providing SSL certificate that needs to be installed on the target machine. In order to be able to use the endpoint under NetworkService security context (see 7.1.1), you have to assign a namespace reservation.
With this command you can specify your port and your Uri, also, a reminder that you have to run this command line under administration rights:
netsh http add urlacl url=http://+:<port>/<uri> user=”NT AUTHORITY\Network Service”
And if you want to delete a namespace reservation, you have to run this command line:
Netsh http delete urlacl url=http://+:<previous_port>/<previous_uri>
¶ 2.1.3 Ping
The “Ping” button checks if your Connect is reachable from TecAlliance network (see chapter 5 Verify the installation)
¶ 2.2 Logging
In this section the log level for Connect and DTS can be set. Also, the connection string to read logs in Azure Storage Explorer can be obtained here.
A detailed guide on how to read logs is available on the wiki.
¶ 2.3 Monitoring
Monitoring is an advanced feature that allows collecting telemetry on various aspects of the solution. When enabled, it is possible to setup email alerts for certain events in Connect that will be monitored.
¶ 2.4 ERP
In the ERP options section, it is possible to configure the different ERP integrations that Connect supports:
- RFC: used to configure RFC server instances that are used for SAP scenarios (outgoing calls from SAP).
- Web Service: used to configure a soap web service that is used for exposing local OpenMessaging endpoint and assign a workflow for further processing.
¶ 2.5 DTS
DTS section allows setting up pickup and download directories for sending and receiving messages like e.g. Stock Orders or Reverse Messages.
Existing directories can be browsed remotely by clicking the refresh icon and then drilled down to the required path. Existing directory paths can also be written manually.
New directories for the pickup or download location can be entered manually. If the configured directories do not exist, Connect will create them. The archive option will store processed messages in Archive subdirectory.
Messages in Send directories will be processed according to the File Detection selection.
The "File Detection" setting allows you to choose how and when files written in the Send directories are picked up and transmitted. The interface offers two options for this setting: "Immediate" and "Scheduled."
Immediate: This option ensures that files added to the Send directories are detected and sent instantly. This means as soon as they are written to the directory, they are immediately processed. Please note, the immediate detection functionality may not be fully supported on certain shared network drives or operating systems. Should you encounter issues with this option, we recommend using the "Scheduled" option.
Scheduled: If you choose this option, you will see an additional field entitled "Schedule CRON" which becomes active. This field allows you to input a CRON schedule that dictates when files will be detected in the directory. Rather than being processed immediately upon being added to the directory, files are detected and processed according to the schedule you set in this field. This feature is recommended to use when the Immediate detection is not compatible with your network drive or operating system, ensuring consistent file processing without potential technical difficulties.
Messages in Received directories will be picked up from the TecAlliance platform according to the configured CRON expression.
By clicking on the “i” icon you will be forwarded to a website to easily configure a CRON expression.
Processing drop down list allows assigning a transformation (IFD or XSLT) to either Send or Receive documents.
In case of Send transformations, detected file is transformed to XML format according to configured Processing option and then forwarded to the Order Platform.
In case of Receive transformations, received documents from Order platform are transformed from XML format to format according to selected Processing option.
Each directory and its content in the DTS tab have to have at least Modify permission granted for user account NetworkService to be able to process the files.
¶ 2.5.1 Shared folder
If you want to use a shared folder with DTS, you have to set a specific user to run the DTS service and it has to have at least Modify permissions on each shared folder.
¶ 2.5.2 Technical details
Connection details
The maximum number of messages that can be sent out at the same time is limited to 10.
Excluded file types
Files ending with .tmp or .wip (case insensitive) are ignored and will not be picked up by the DTS service.
¶ 2.6 CMD
CMD section allows to configure Connect to transfer articles and price data from the parts manufacturer to the CMD Platform (platform) and data transfer from the platform to a trading company. It is required that the TecId is assigned to an organization in Solution Portal in order to use Connect to send or receive CMD files.
CMD integration can be defined per environment ('Staging' for testing purposes and ‘Production’), but only the selected environment is active in the client.
Default option selected for the environment is ‘None’. In that case, Connect will not transfer any CMD files.

Each environment can be configured for the role of ‘Sender’ or ‘Receiver’.
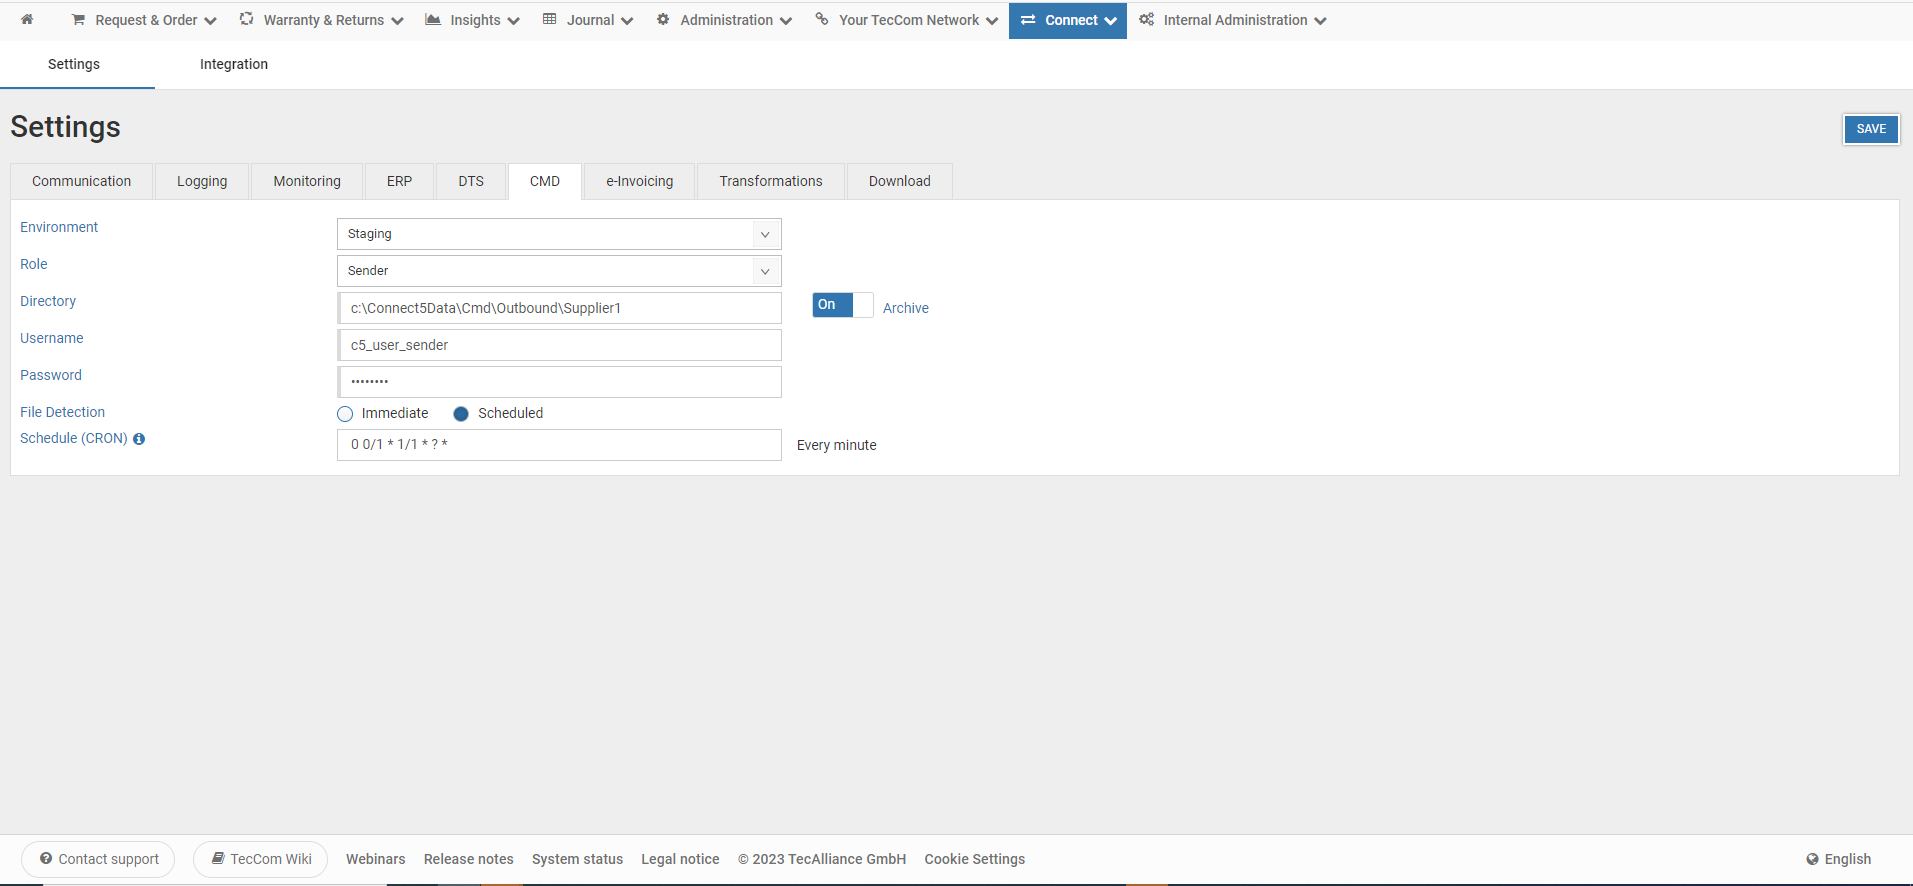
¶ 2.6.1 Configuration for Sender Role
With role set to ‘Sender’, Connect sends CMD files to the platform.
It is required to define a directory where CMD files will be to picked up from, username and password to connect to the platform.
The "File Detection" setting allows you to choose how and when files written in the directory are picked up and transmitted. The interface offers two options for this setting: "Immediate" and "Scheduled."
Immediate: This option ensures that files added to the directory are detected and sent instantly. This means as soon as they are written to the directory, they are immediately processed. Please note, the immediate detection functionality may not be fully supported on certain shared network drives or operating systems. Should you encounter issues with this option, we recommend using the "Scheduled" option.
Scheduled: If you choose this option, you will see an additional field entitled "Schedule CRON" which becomes active. This field allows you to input a CRON schedule that dictates when files will be detected in the directory. Rather than being processed immediately upon being added to the directory, files are detected and processed according to the schedule you set in this field. This feature is recommended to use when the Immediate detection is not compatible with your network drive or operating system, ensuring consistent file processing without potential technical difficulties.
Also, it is possible to enable files to be archived after they are sent to the platform. If Archive is set to ‘enabled’, sent files will be stored in archive subdirectory of the directory which has been defined for pickup.
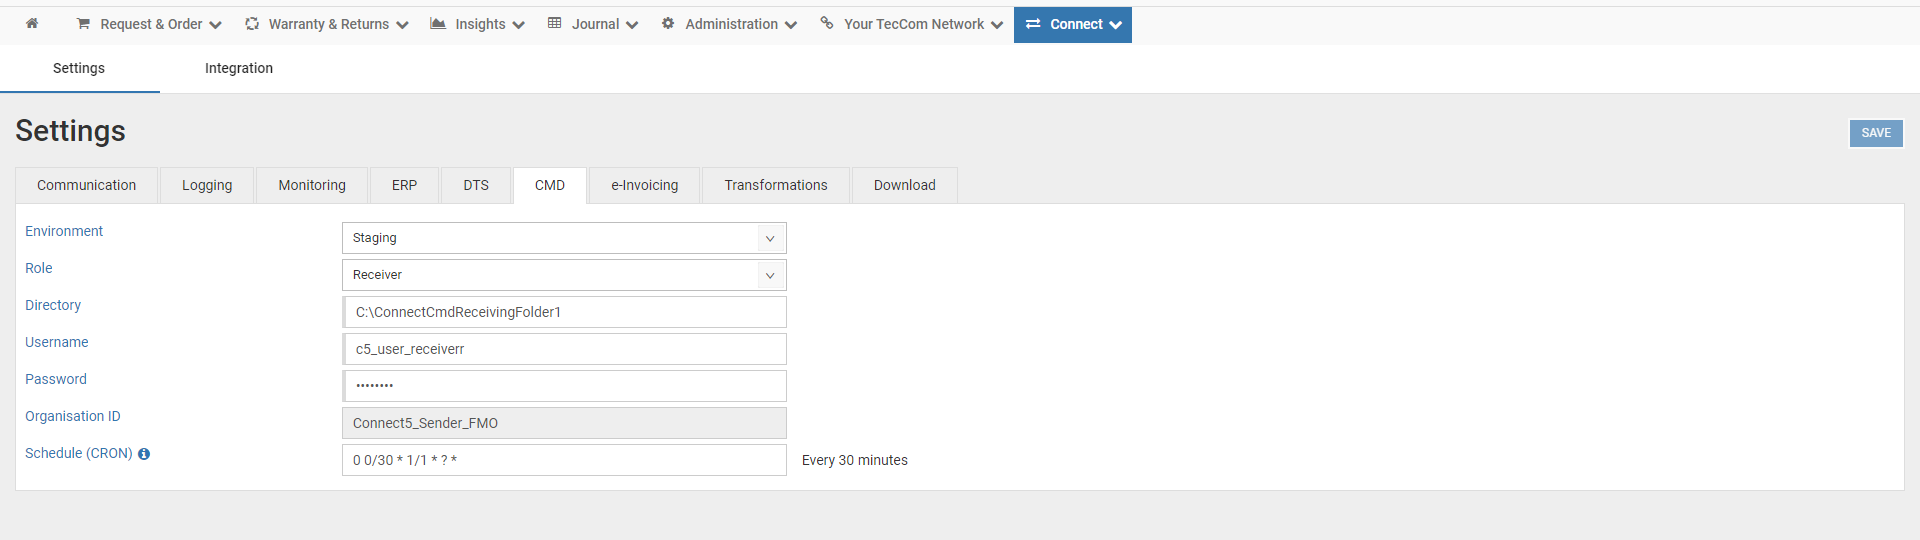
¶ 2.6.2 Configuration for Receiver Role
With role set to ‘Receiver’, Connect downloads CMD files from the platform.
Similar to the configuration of the ‘Sender’ role, a directory, where the files will be stored after download, username and password to connect to the platform must be configured. Organization ID is retrieved automatically from the Solution Portal, using the TecId of the selected organisation.
Schedule, defined as CRON expression determines the frequency of the download of the documents from the platform. In the example below, the download frequency is set to every 30 minutes.
¶ 2.7 e-Invoicing
e-Invoicing allows configuring e-Invoicing service to deliver electronic invoices (Suppliers) to their invoice recipients and also detailed structured files to support automatic invoice processing flows. Download of the invoice for the receivers of these invoices (Suppliers and Buyers) can also be configured.
Buyers can configure the reception mode to download the invoices from the e-Invoicing server. Suppliers, on the other hand, can configure both modes: dispatcher mode which is required to send files to the e-Invoicing server, and the optional reception mode to receive the invoices that we were sent to the e-Invoicing server.
The e-Invoicing configuration can be defined per environment ('Staging' for testing purposes and ‘Production’), but only the selected environment is active in the Connect.
Default option selected for the environment is ‘None’. In that case, Connect is not configured for transfer e-Invoicing files.
¶ 2.7.1 Configuration for Sender Mode (Dispatcher)
This mode is intended for suppliers who use e-Invoicing dispatcher to send electronic invoices. The purpose is to deliver a PDF together with structured invoice data at the position level in the TXML 2.5 format. Also, it is possible to use this mode to send a PDF together with Processing Instructions files in TXML 3.0 format.
In this mode we have to configure the following parameters:
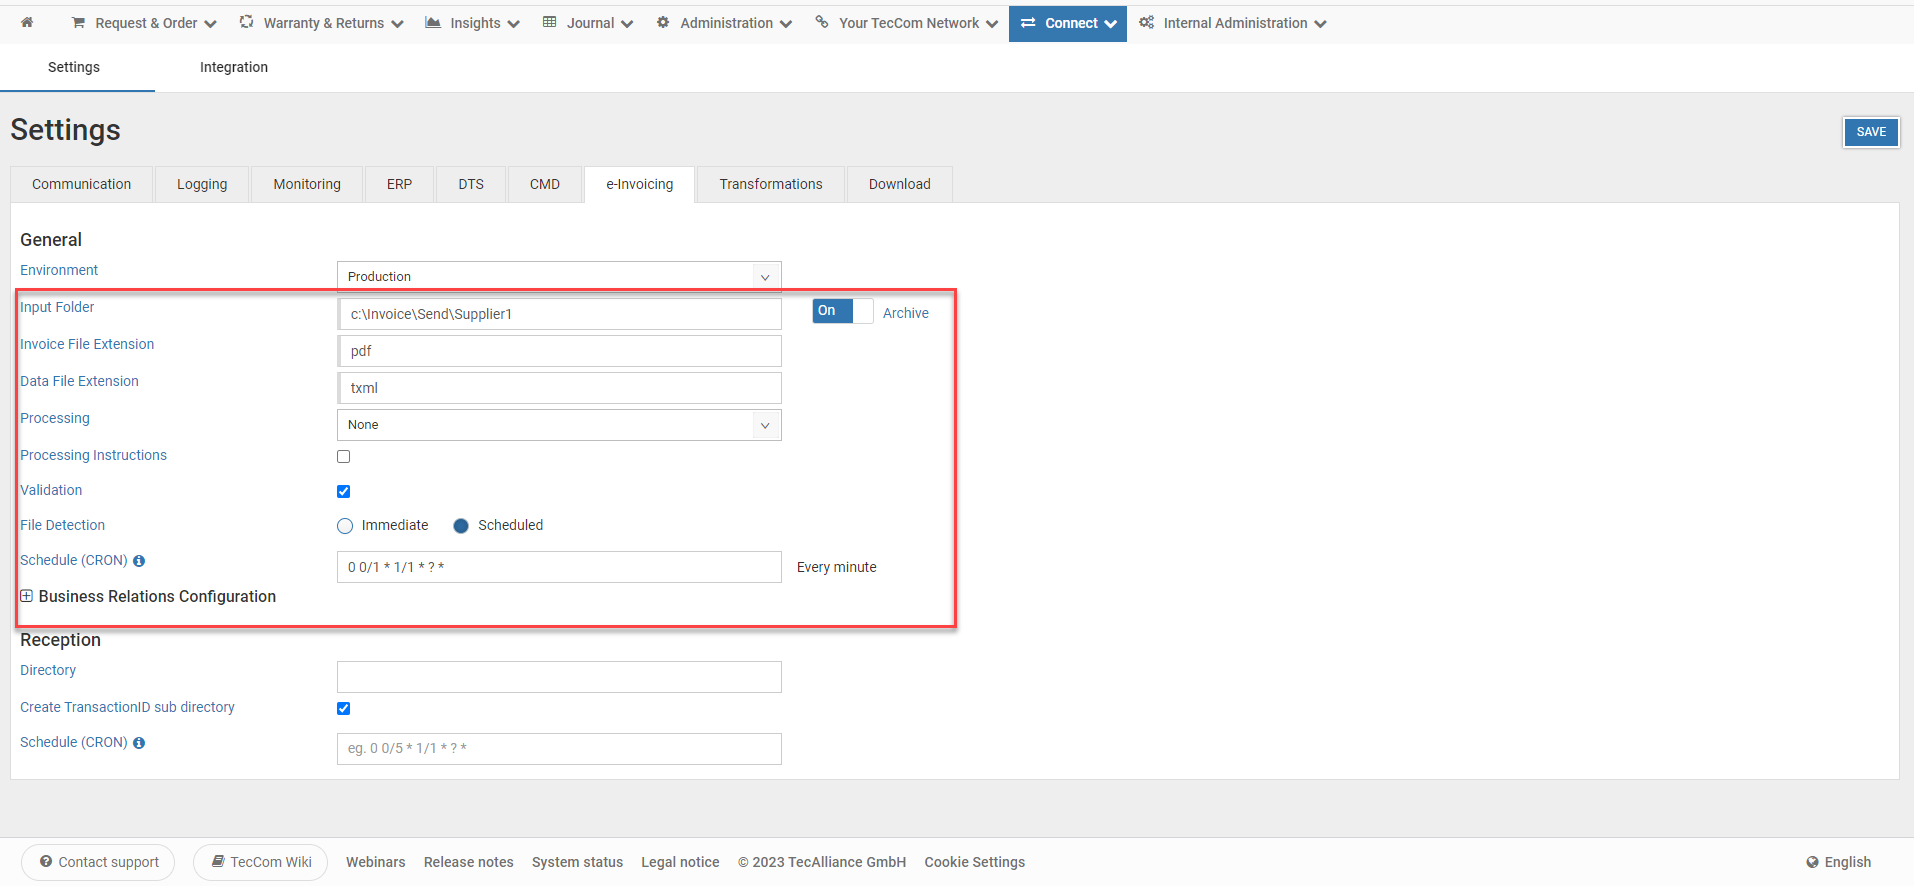
- Input folder: specify the directory where the application picks up the invoice files to be sent to the invoice server.
- Archive: activate this option to archive the files in the subdirectory when the dispatcher has successfully finished the processing.
- Invoice file extension: define the extension of the invoice file which is sent to the server. Usually, a PDF file is used, but other formats are also allowed.
- Data file extension: define the extension of the file for the structured invoice data. Default value is ‘txml’ for invoices in TXML2.5 format and ‘xml’ for the processing instructions format.
- Processing: define a transformation that is applicable to the invoice document (XSLT or Plugin). This option is only available for input received in TXML2.5 format, not for the processing instruction.
- Processing instructions: mark this option as enabled to activate the dispatcher to process the input files with the processing instructions format. In case of sending another format that can not be parsed as processing instructions, the dispatcher will fail when the file is processed. If a transformation in the ‘processing’ dropdown is selected, the processing instructions checkbox is automatically disabled and TXML 2.5 format is expected in the input files.
- Validation: When input files are received in TXML 2.5 format, this option can be activated. The input file is then validated using the XSD for Invoice 2.5 to ensure that the required fields are defined.
- Organisation ID: this field is retrieved automatically from the Solution Portal. It is obtained using the TecId assigned to the organisation.
- Username: username to connect to the e-Invoicing server.
- Password: password to connect to the e-Invoicing server.
- File Detection: allows you to choose how and when files written in the directory are picked up and transmitted. The interface offers two options for this setting: "Immediate" and "Scheduled."
- Immediate: this option ensures that files added to the directory are detected and sent instantly. This means as soon as they are written to the directory, they are immediately processed. Please note, the immediate detection functionality may not be fully supported on certain shared network drives or operating systems. Should you encounter issues with this option, we recommend using the "Scheduled" option.
- Scheduled: if you choose this option, you will see an additional field entitled "Schedule CRON" which becomes active. This field allows you to input a CRON schedule that dictates when files will be detected in the directory. Rather than being processed immediately upon being added to the directory, files are detected and processed according to the schedule you set in this field. This feature is recommended to use when the Immediate detection is not compatible with your network drive or operating system, ensuring consistent file processing without potential technical difficulties.
¶ 2.7.1.1 Business Relation configuration
When expanding the section Business Relation Configuration, more transformations can be added depending on the customer number in the input files. By default, the option in the table with the ‘Invoice Party Number’ equals to ‘*’. This configuration is applied for all the input files if the customer number does not have a specific row for this customer number.
In the image below, we can see the default configuration without any processing, but we can define a ‘xslt’ transformation or ‘plugin’ transformation to use by default.
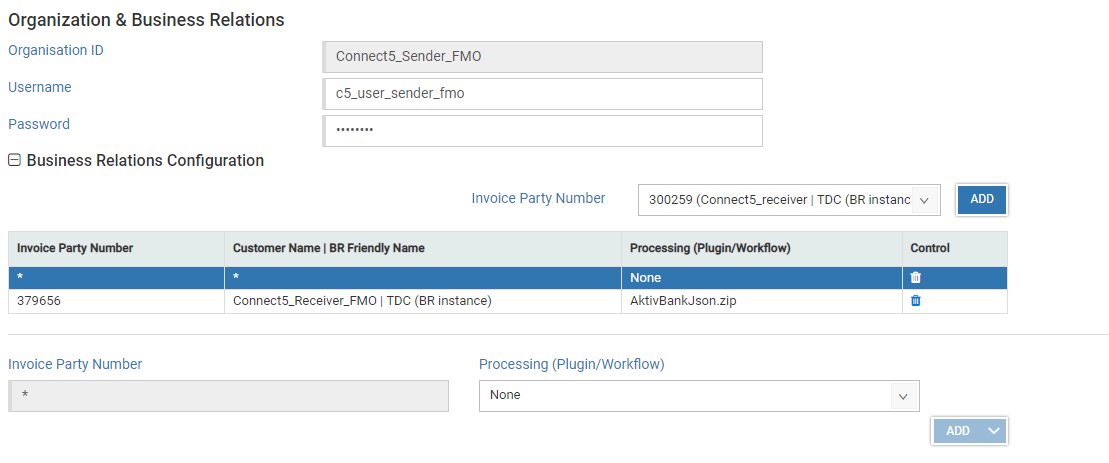
If a customer number is added to the table (in the image 379656), select a plugin transformation to add input parameters that are used within the plugin.
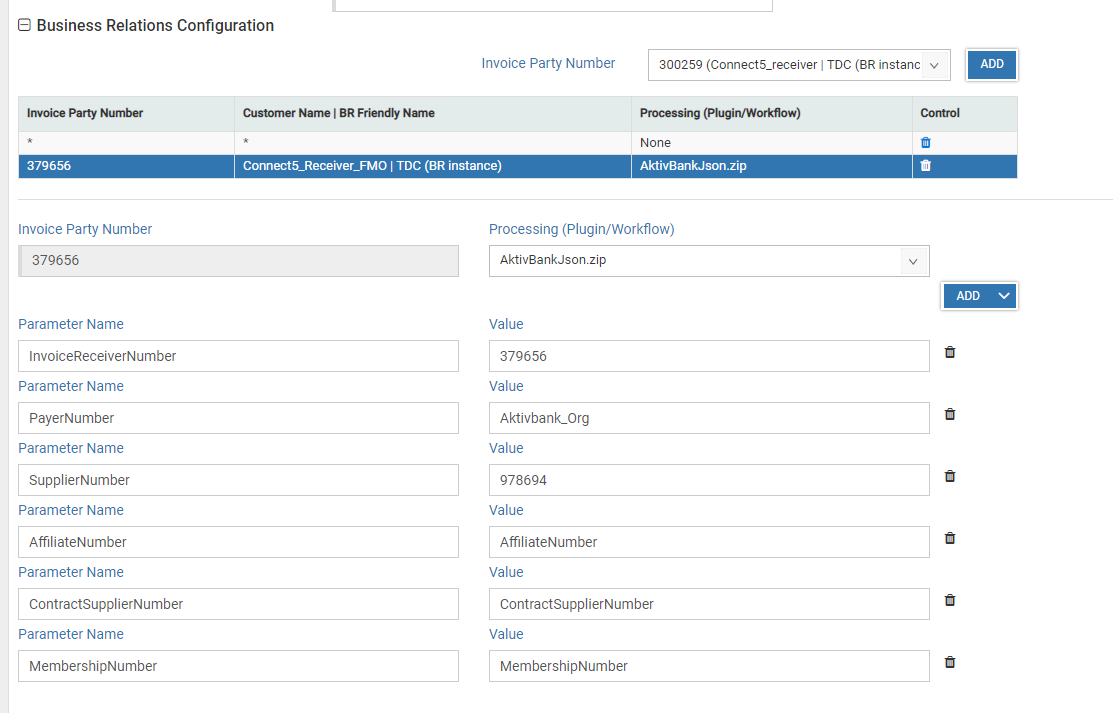
If a plugin is selected for processing (.zip file extension), parameters used by the plugin can be defined. By clicking ‘Add’ button a single parameter is added. Both parameter name and value must be defined.
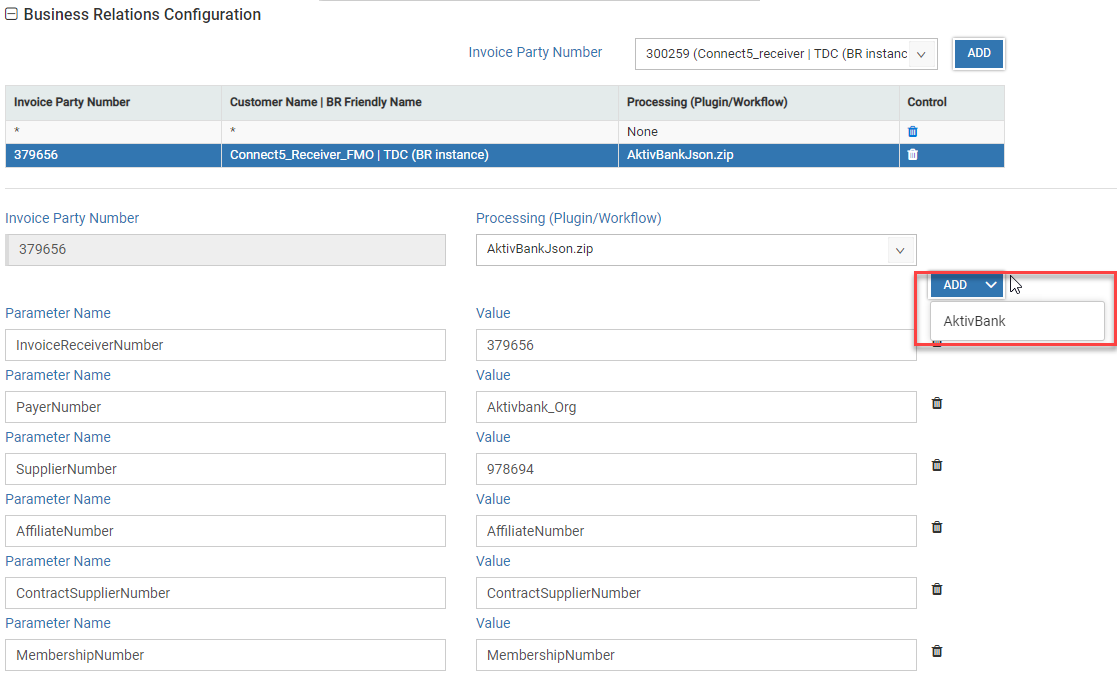
For AktivBank scenario parameter template button is available (‘Add→AktivBank).
By clicking on the ‘Add→AktivBank’ button, default parameters for AktivBank scenario are added. With this action, all the parameters for Aktivbank are added automatically and only their values must be defined manually.
In the example below, the AktivBankJson.zip plugin has a list of default parameters that need to be defined.
¶ 2.7.2 Configuration for Receiver Mode (Pull Client)
The latest two fields are related to the e-Invoicing pull client. This configuration is available both for Suppliers and Buyers.
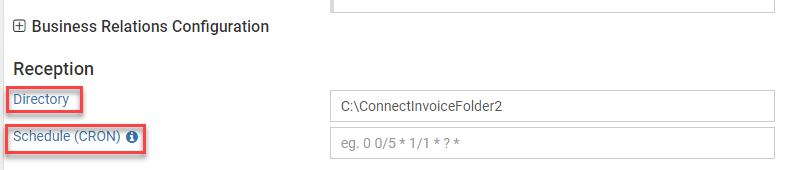
With Receiver mode enabled, files (can be different for sender and receiver) that are configured for the ‘Business Relation’ in Solution Portal are downloaded once they are available on the e-Invoicing server.
The receiving folder is set in ‘Directory’, while the CRON expression to configure the schedule for download is set in ‘Schedule (CRON)’. For example: if the schedule is set to ‘0 0/1 * * * ? *’, the e-Invoicing pull client will try to download available files every minute.
¶ 2.8 Transformations
In this section transformation files (.ifd and .xslt) and plugins (.zip) can be uploaded. These transformation files can be used when additional processing of documents is set up in the DTS section.
Transformation files can be uploaded either as Private or Shared:
- Private transformations are only available for the current organization
- Shared transformations are available for entire Connect instance
Note: If two transformation files with the same name are uploaded both as private and shared, then the private transformation is used
¶ 2.9 Download
After configuring a communication channel (see chapter 2.1 Communication) and in case of Supplier integration options (see chapter 3 Configure Integration (Suppliers only) you can download the Connect setup by going to the Options tab “Download” in Connect - Settings section of the TecCom Portal.
In case of multiple client installations, you can set an Alias for the Connect product instance before downloading the archive. The Connect client which runs as a Windows Service after installation on the Windows Server of the buyer or supplier contains this Alias name.
Note: It is recommended to set Alias for all installations
¶ 3. Configure Integration (Suppliers only)
¶ 3.1 Integration type
In this tab you can configure how Connect will integrate with the ERP of your organization. There are several possibilities and each one supports different integration scenarios.
In the first tab “Integration Type” of this section you can configure how Connect will integrate with the ERP of your organization.
The integration is configured “per request type” by simply assigning the integration dropdown options to the chosen type. Optionally you can also change the different Log levels for the whole integration process. By default, it is set to Information.
Validate response enables you to activate or deactivate the schema validation of responses from integration endpoint before they are sent to the platform.
Note: Remember to save the changes with the “SAVE” button in the upper right side of the screen after editing options.
¶ 3.2 SAP integration
This section allows configuring integration of Connect with SAP solutions. After selecting the SAP dropdown options you must go to the SAP tab window to set the parameters required for the SAP integration.
In tab “SAP” the required parameters for connecting to SAP can be provided: SAP Host & Credentials for connecting to SAP environment and other parameters used for initializing the SAP module, e.g. client, language and destination.
¶ 3.3 Plugin integration
Another common scenario is to develop a custom integration between Connect and ERP. For this case a provided standalone library can be finished with the custom processing logic and the compiled plugin can be uploaded through TecCom Portal so that Connect can use it to process requests.
In the tab “Plugin” the properties of the current plugin can be checked, and a new plugin can be uploaded.
Note: in order to upload a new plugin, you need to click on the browse input and choose the plugin zip file from the file explorer. After that a SAVE is required in order to upload the plugin to the cloud storage.
Please also note that the plugin must be uploaded for each organisation that should use it.
¶ 3.4 TBC integration
This section allows a supplier to activate the connection with TecCom Business Cloud, configure settings to upload data to TecCom Business Cloud, and receive article orders from buyers.
¶ 3.4.1 Activate the connection with TecCom Business Cloud
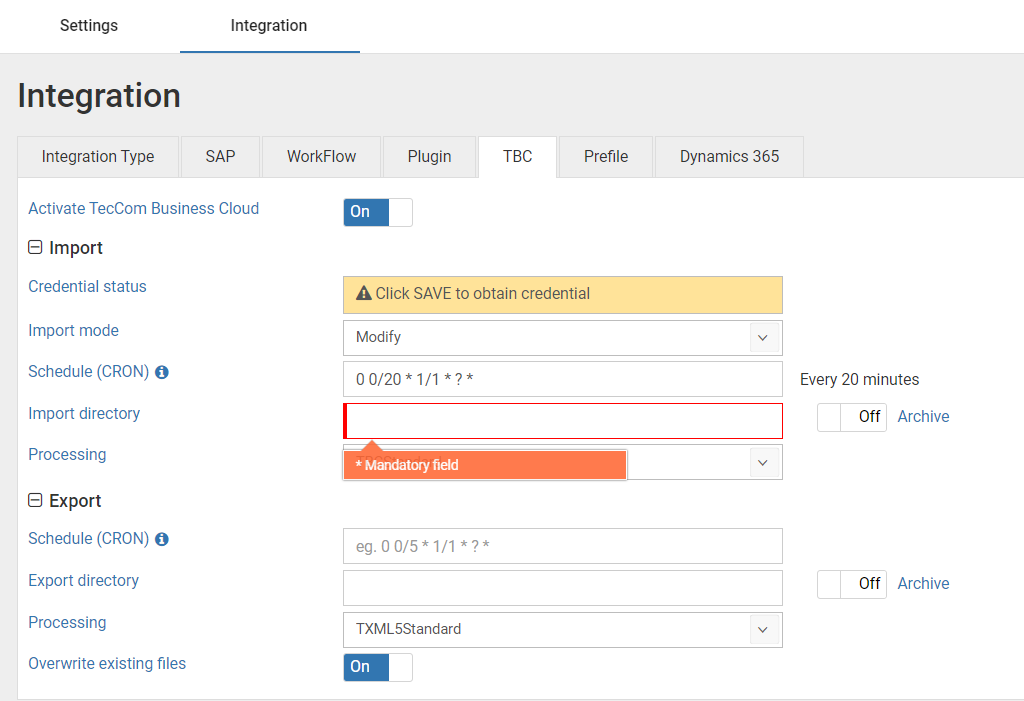
To activate the connection with TecCom Business Cloud, simply switch the toggle 'Activate TecCom Business Cloud' to the 'On' mode. After switching it to the “On” mode, configuration sections for Import and Export will be displayed, like below:
¶ 3.4.2 Supplier configuration for import
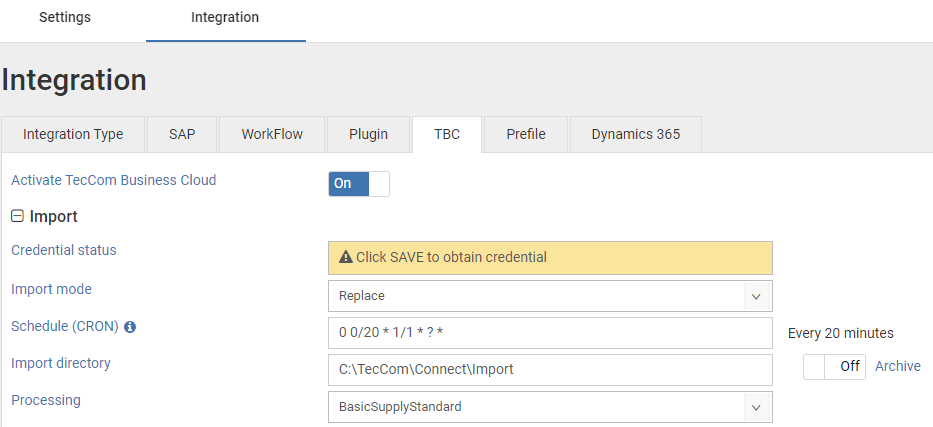
Configure the import process in the Import section here:
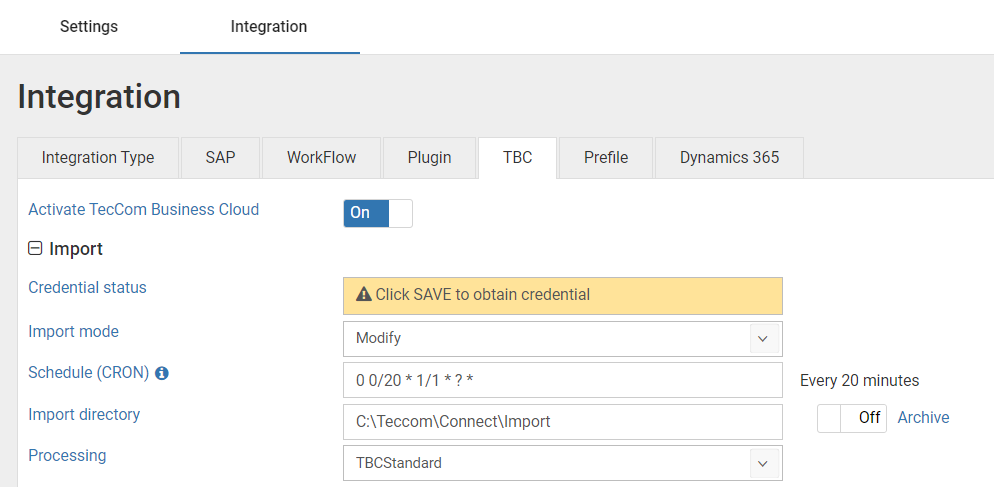
- Credential status: The status of the Client Credential.
- Import mode: there are 2 import modes for now:
- Replace mode: In general, when choosing Replace mode to import, all existing relevant data of the supplier will be deleted. After that, the new data from the input files will be imported.
(To gain a clearer understanding of how Import behavior functions in Replace mode across various file types, please refer to this guide). - Modify mode: In general, when choosing Modify mode to import, the relevant data of the supplier will be updated.
(To gain a clearer understanding of how Import behavior functions in Modify mode across various file types, please refer to this guide).
Note: The Modify mode will not be available when choosing processing "BasicSupplyStandard" (like in existing Basic Supply the whole data will be replaced).
- Replace mode: In general, when choosing Replace mode to import, all existing relevant data of the supplier will be deleted. After that, the new data from the input files will be imported.
- Schedule (CRON): A cron expression string that determines how often the import job runs. (To learn more about CRON expressions, please refer to here).
- Import directory: A directory designated for the supplier to place their import files. This directory requires a full path.
Note: This directory should be on the machine that the connect client was installed (please be sure that the connect has access to this folder). - Archive: A toggle for users to switching On or Off
- On mode: After the import job finishes, imported files will be archived.
- Off mode: After the import job finishes, imported files will not be archived.
- Processing: The Import Processing Flow: we can choose either “TBCStandard” or “BasicSupplyStandard”
- TBCStandard: This is the standard processing of TecCom Business Cloud.
- BasicSupplyStandard: This option is for importing the Basic Supply files. Please notice, that BasicSupplyStandard is deprecated and will be discontinued in the future. It's only meant to be used by existing BasicSupply customers to facilitate the migration away from the old solution. BasicSupplyStandard is not a valid option for new customers. Description can be found here
Note: After saving the configuration, the supplier user can import data by putting their import files in the specified "Import directory". The import job will run according to the schedule defined in "Schedule (CRON)" to import the data.
¶ 3.4.3 Configuration for export
Configure the export process in the Export section here:

- Schedule (CRON): A cron expression string that determines how often the export job runs. (To learn more about CRON expressions, please refer to here).
- Export directory: Where all exported files are stored after the job finishes. Please provide a full path for this directory.
Note: This directory should be on the machine that the connect client was installed (please be sure that the connect has access to this folder). - Archive: A toggle for users to switching On or Off
- On mode: In addition to generating the exported files in the specified "Export directory," those exported files will also be archived.
- Off mode: Only generate the exported files in the specified "Export directory" without archiving them.
- Processing: The Export Processing Flow: we can choose either “TXML5Standard” or “BasicSupplyStandard”
- TXML5Standard: Selecting this option results in exported files in TXML5 format.
- BasicSupplyStandard: Choosing this option produces exported files in the standard format of Basic Supply (CSV format). Please notice, that BasicSupplyStandard is deprecated and will be discontinued in the future. It's only meant to be used by existing BasicSupply customers to facilitate the migration away from the old solution. BasicSupplyStandard is not a valid option for new customers.
- Overwrite existing files: A toggle for users to switching On or Off
- On mode: After the export job finishes, new exported files will overwrite existing files in the directory.
- Off mode: After the export job finishes, existing files in the directory will not be overwritten. New exported files will be saved with unique names if they would otherwise conflict with existing files.
Note: After saving the configuration, the supplier user can receive the article's order information whenever their articles are ordered by a buyer. The order information will be exported to the specified "Export directory", and the export job will run according to the schedule defined in "Schedule (CRON)."
¶ 3.5 Prefile integration
The Prefile backend of Connect utilizes a standardized database to store ERP master data and orders.
The directories from import and export must have permissions granted to the user account NetworkService to be able to process the files (see 7.1.1).
¶ 3.5.1 Prefile configuration
First, there are several options to control the behaviour of the Prefile backend:
- Remove special characters: if switched on, the material numbers sent in a message are normalized by removing any special characters before searching for the material in the database.
- Return requested material as-is: if switched on, the material numbers returned in the response will always be the same that were sent.
- Accept all line items (including errored and no available items): if switched on, all items that customer sends (orders and stock orders) will be written to the database and exported. For items that are not found or have zero stock, a FreeText element is added to the item response stating that status is unclear and no information can be given with regard to its delivery. Only if the request is an inquiry and the item does not exist in the database, the "TEC-1007: Material master does not contain product: 99999" error is returned (if searching by EAN, the error is "TEC-1014: Impossible to convert EAN code 2376489423 into product no").
- Decrement stock level: if switched on, the stock of a material in the database will be decremented by the confirmed amount. (Potentially dangerous!) Express Orders only.
For the data import and export to work, these settings have to be configured for each:
- the path where Connect will read (Import directory) or write (Export directory) the data files;
- the CRON expression which controls the schedule of the import or export;
- the field separator that is used in the data files.
Other optional settings for the Prefile Import / Export task are:
- the archive switch can be enabled to create a backup of the data files in “Archive” directory under configured import or export path
- the “Overwrite existing files” option, when enabled, overwrites any existing exported files. When this option is disabled, any existing files are backed up with a timestamp under the same path.
Lastly, the database can be chosen:
- SQLite: no further configuration is needed, as the database engine is contained within Connect. Only recommended for low to moderate traffic
- SQL Server (Express):
- PREREQUISITE: Only for Windows 11, these steps must be applied before installing Connect5 Client:
- Open “SQL Server 2019 Configuration Manager” as administrator. Go to “SQL Server Network Configuration” > “Protocols for MSSQLSERVER”
- PREREQUISITE: Only for Windows 11, these steps must be applied before installing Connect5 Client:
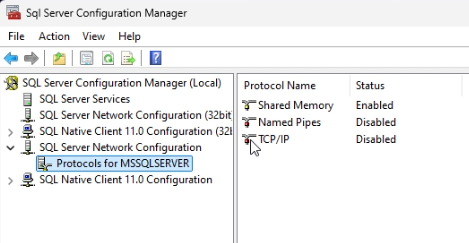
- Enable “TCP/IP”
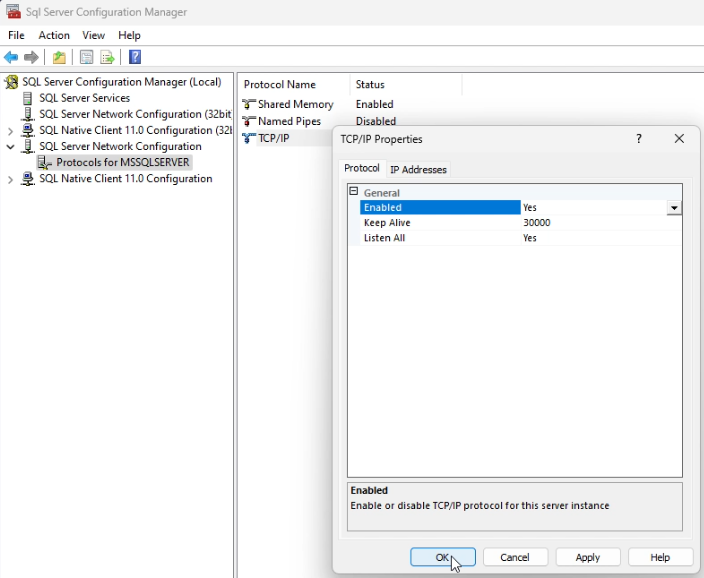
- Go to “SQL Server Services” and restart “SQL Server (MSSQLSERVER)” clicking on restart button

- Default configuration:
- No additional settings are needed and the local default SQL Server instance is used. But you must ensure that:
- SQL Server Express is installed as “Default instance” and not as “Named Instance”
- SQL Server (Express) “Mixed Mode Authentication” is enabled
- No additional settings are needed and the local default SQL Server instance is used. But you must ensure that:
- Custom configuration:
- If you can't fulfill the requirements for the default configuration or you want to use your existing SQL Server which is installed elsewhere (not on the Connect server), you can use custom configuration.
- Host, database, username and password have to be provided. The provided user needs to have administrative rights in order to create the database (these rights can be removed after the database has been created by the Connect service).
- It is not possible for you to create the database yourself by means of an SQL script, because the Connect must be able to perform automatic database migrations, and for that to work it must create the database by itself.
- Host: the hostname or IP address of the SQL Server (Express) database server
- Database: the name of the Prefile database to be created in the SQL Server
- Database Directory: if this is set, the database files will be created in the specified directory (on the server where SQL Server is running!); otherwise the database files will be created in the default data directory of SQL Server
- Username: an existing SQL Server user
- Password: the password for the SQL Server user
¶ 3.5.2 Search flow
When using Prefile integration the search of parts will be executed in the following order (if no results are found on one step, it will proceed to the next one):
- Search by EAN
- Search by Product Number:
- Search for Product Number and Maker Code in REFERENCEMAT.MAT_NR_MANUFACT and REFERENCEMAT.NR_SYS_MANUFACT
- If “Remove special characters” setting is on, search for Product Number and Maker Code in
REFERENCEMAT.MAT_NR_MANUFACT_PROCESSED (this column will be filled when importing, with the value of MAT_NR_MANUFACT without special characters) and REFERENCEMAT.NR_SYS_MANUFACT - Search for Product Number and Maker Code set to * (asterisk) in REFERENCEMAT.MAT_NR_MANUFACT and
REFERENCEMAT.NR_SYS_MANUFACT - If “Remove special characters” setting is on, search for Product Number and Maker Code set to * (asterisk) in
REFERENCEMAT.MAT_NR_MANUFACT_PROCESSED (this column will be filled when importing, with the value of MAT_NR_MANUFACT without special characters) and REFERENCEMAT.NR_SYS_MANUFACT - Search for Product Number in MATERIAL.MATERIAL_NR
- First search for "material_nr" and "maker_code".
- If it has not found it, search for "material_nr".
- If it has found a unique material, return it.
- If it has found more than one material.
- Return error code 2701 (if the "makerCode" search parameter is null, empty or "*").
- Otherwise return error code 2702.
- If “Remove special characters” setting is on, search for Product Number in MATERIAL.MATERIAL_NR_PROCESSED
- Search by Buyer Product Number:
- Search for Buyer Product Number and Buyer Party Number in CUSTMATERIAL.CUST_MATERIAL_NR and
CUSTMATERIAL.PARTNER_NR - If “Remove special characters” setting is on, search for Buyer Product Number and Buyer Party Number
in CUSTMATERIAL.CUST_MATERIAL_NR_PROCESSED and CUSTMATERIAL.PARTNER_NR- If “Accept all line items” setting is on, the part item is marked as Not Processed (even it was not found on database).
- The part item was not found
- Search for Buyer Product Number and Buyer Party Number in CUSTMATERIAL.CUST_MATERIAL_NR and
- Search by Buyer Product Number:
¶ 3.5 Dynamics 365
In tab “Dynamics 365” the required parameters for connecting to Dynamics 365 can be provided.
¶ 4. Install or Upgrade
¶ 4.1 Install or Upgrade options
When the download (described in section 2.9 Download) completes, unpack the archive and double click the setup.cmd file to launch the installation process on your server. Follow the instruction in the Windows installer dialog to configure installation property.
You can perform an upgrade of an older installed instance or install the new Connect as new product instance. As usual it is also possible to change the product installation path.
Note: .NET Framework 4.8 is a mandatory requirement to be able to install Connect
¶ 5. Verify the installation
Once you have installed Connect, you can verify that its communication is correct. To do this, just press the PING button on the “Communication” tab of the Connect - Settings section.
The way this works, a request is sent to all listening Connect instances configured for your destination. When the instance(s) receive the request, they send a response with version, IP address and host name. Additionally, you can stop the instance by clicking "Stop instance".
¶ 6. Removing Connect
In order to remove Connect, you can do it either from Programs And Features (Add/Remove Programs) selecting the Connect instance and clicking Uninstall. This option uninstalls all installed components and all the files that might have been generated after the installation (Settings and temporary files).
If you would like to keep the settings and temporary files, for scenarios such as when upgrade is not possible or when moving machines you can do it by launching the Connect setup program via the setup.cmd that you used for its installation. By doing that, you can select the instance that you want to uninstall and select Remove. On the confirmation dialog you can uncheck the Remove settings and temporary files and confirm by clicking Remove button.
¶ 7. Advanced Scenarios
¶ 7.1 Security
¶ 7.1.1 Windows Services Accounts
Network Service
Starting with version 5.0.900, Connect client is installed by default with services running under NetworkService account. Setup program assigns permissions to the installation folder. For Connect to be able to access additional directories, explicit permissions must be manually given to such folders. This applies specifically to DTS send/receive directories and Prefile import/export directories.
Local System
The Connect ERP service runs under local system. This service is responsible for deploying ERP services instances, that run under Network Service Account
Custom Account
In some scenarios (when using DTS with shared network drives), a specific user with permissions to the network drive must be used. In this case, the services should run under this user account. In order to change the account of the DTS service, open the Services Snap-in under administrator privileges and right click the service. Select the Log-on tab select “This account” and provide the user credentials of the user. Service might need to be restarted after this change.
¶ 7.1.2 Plugins Sandbox
Additional security measure can be applied by running integration plugin inside a sandbox. This is an optional configuration that can be enabled by placing a plugin.security.settings.json file to the root of the installation directory. Services must be restarted prior this setting taking effect.
{
  "RunPluginWithFullTrust": false,
  "PathPermissions": [],
  "WebPermissions": []
}
RunPluginWithFullTrust
When this element is set to false, the plugin component will be instantiated in a sandbox container with unlimited I/O permissions only within the plugin directory.
PathPermissions
Additional permissions can be given outside of the plugin directory by granting I/O permissions to additional folders in PathPermissions node.
"PathPermissions": ["c:\\Folder1", "c:\\Folder2"]
WebPermissions
Additional permissions to access HTTP internet/intranet resources can be granted by adding an absolute Uri or regular expression to the WebPermission node.
"WebPermissions": ["https://api.example.com/"]
¶ 7.2 Non-English Language Servers
¶ 7.2.1 German language
If Connect is being installed on a German server, the logon account for the installed services (Connect, DTS and RFC) must be manually set to Netzwerkdienst local account without providing a password after the installation.
¶ 7.2.2 Other languages
Other than German languages were not tested, but we believe that the procedure would be similar as for German server. Only the local name for NetworkService will be different
¶ 7.3 Proxy Communication
Scenarios, where internet access is only available via proxy server, can be enabled by placing proxy.settings.json file to the root of the installation directory. Services must be restarted prior this setting taking effect.
{
  "Proxy": {
    "Uri": "http://127.0.0.1:8888",
    "UserName": "proxyUser",
    "Password": "",
    "PlainTextPassword": "proxyPassword",
    "Enabled": false
  }
}Uri
Uri that contains the address of the proxy server.
UserName
If authentication is required, the user name associated with the credentials, can be set here.
Password
Encrypted password for the proxy credential. This is set automatically after restart.
PlainTextPassword
If authentication is required, the password for the user name associated with the credentials can be set here. This is to be entered in plain text and will be encrypted and set to Password node upon next (re)start of the services.
Enabled
Enables or disable the use of configured proxy server.